Excel drop-down list data validation is one of the most practical tools for anyone managing shared spreadsheets. If your team records project statuses, client categories, or approval stages in Excel, you have probably seen the same value entered five different ways. Drop-down lists fix that problem, and they take less than two minutes to set up.
Why Data Entry Errors Happen in Excel
Shared spreadsheets invite inconsistency. One person types “In Progress,” another types “in progress,” a third writes “In-Progress.” When you filter or report on that column later, none of them match. The problem is not carelessness. It is that Excel, by default, accepts anything you type.
Common causes of data entry errors in shared Excel files include:
- Inconsistent capitalisation and spelling across team members
- Typos that go unnoticed until reporting time arrives
- Copy-paste mistakes that bring in hidden characters or extra spaces
- Different staff members using different naming conventions for the same thing
Drop-down lists remove the guesswork by restricting what can be entered to a pre-approved set of values.
What a Drop-Down List Does
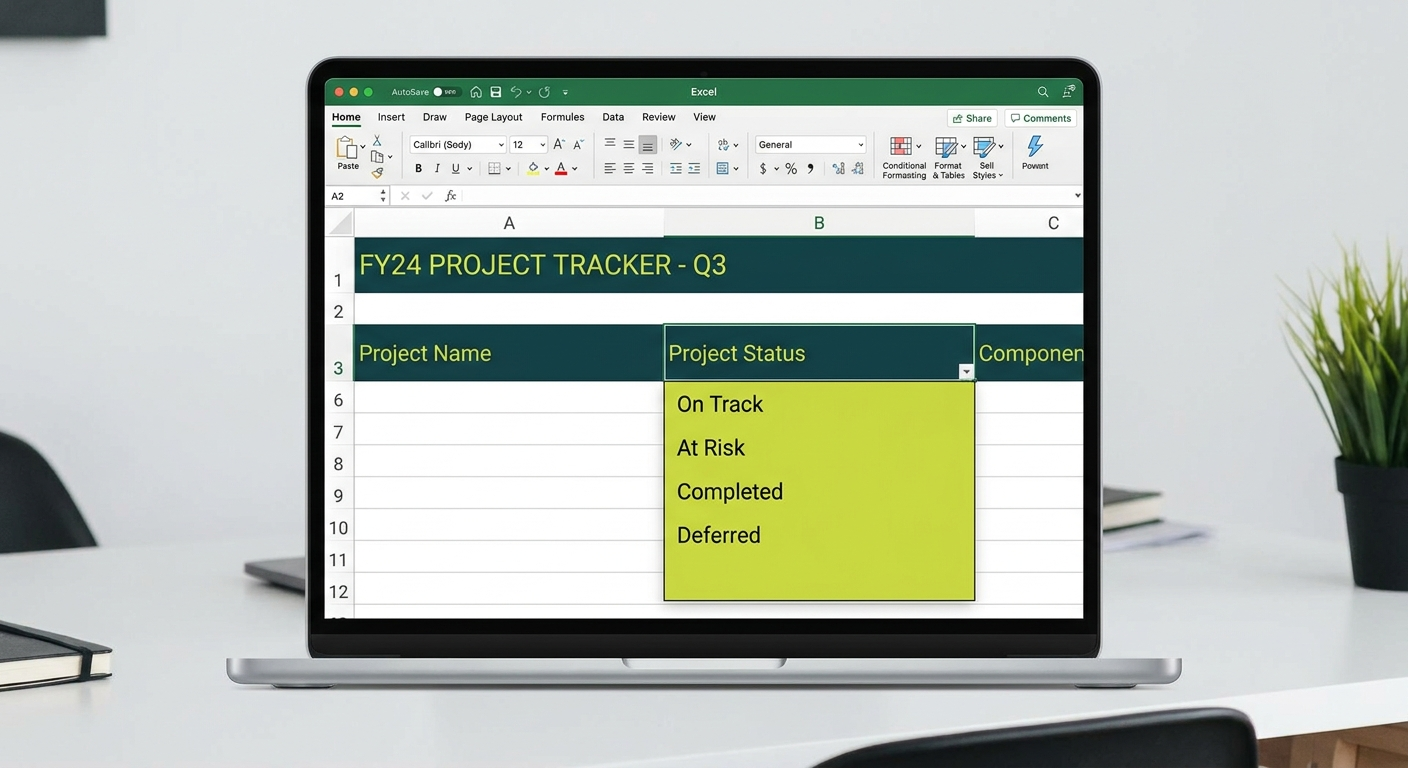
A drop-down list, created using Excel’s Data Validation feature, limits a cell to only the values you specify. When a user clicks the cell, a small arrow appears. Clicking it reveals a list of options. They select one, and that value is recorded.
No free typing. No variation. No cleanup needed later.
This is particularly valuable for shared spreadsheets where multiple people contribute data, or where the sheet feeds into a report, Power BI dashboard, or another system downstream.
How to Create a Simple Drop-Down List
Here is the step-by-step process for adding a drop-down list to any Excel cell or range:
- Select the cell or range of cells where you want the drop-down to appear.
- Go to the Data tab on the ribbon.
- Click Data Validation in the Data Tools group.
- In the Allow field, select List.
- In the Source field, type your options separated by commas. For example:
Pending, In Progress, Complete, On Hold - Click OK.
The selected cells will now show a drop-down arrow when clicked. Users can only enter values from your list.
How to Create a Drop-Down List from a Cell Range
For longer lists, typing values directly into the source field becomes unwieldy fast. A better approach is to store your list in a separate range of cells and point the validation rule to that range.
- Create a list of values in a column, for example in cells
Sheet2!A1:A10. - Select the cells where you want the drop-down to appear.
- Open Data Validation as described above.
- In the Source field, click the range selector and highlight your list.
- Click OK.
This approach makes it easy to update the list later. Change the values in the source range, and the drop-down updates automatically. For large lists such as product codes, staff names, or suburb lists, this is the recommended method.
How to Add an Error Message for Invalid Entries
If someone tries to type a value that is not on the list, you can display a custom error message instead of silently allowing invalid data through.
- In the Data Validation dialog, click the Error Alert tab.
- Make sure Show error alert after invalid data is entered is ticked.
- Choose a style: Stop prevents invalid entries entirely; Warning allows the entry but displays a message; Information shows a message without blocking the input.
- Add a title and message. For example: Title: “Invalid Entry” and Message: “Please select a value from the drop-down list.”
- Click OK.
Stop is usually the right choice for fields that feed into reports or other systems where consistency matters most.
How to Create Dependent Drop-Down Lists
A dependent drop-down list changes its available options based on the value selected in another cell. For example, selecting “Victoria” in a State column could show only Victorian cities in the adjacent column.
The cleanest way to set this up uses named ranges and the INDIRECT function:
- Create a named range for each parent value. For example, name the list of Victorian cities “Victoria” and the list of NSW cities “New_South_Wales”.
- In the dependent column, open Data Validation and set the Source to
=INDIRECT(A2), where A2 contains the state selection. - Excel will look up the named range that matches whatever is in A2 and use that as the drop-down source.
Note that named ranges cannot contain spaces, so use underscores or CamelCase for multi-word names such as New_South_Wales or WesternAustralia.
Using Copilot in Excel to Build and Manage Lists
If your organisation uses Microsoft 365 Copilot, you can use it to speed up the process of building and maintaining your validation lists significantly.
Here are practical Copilot prompts to use directly inside Excel:
- “Create a list of standard project status values for a professional services firm” , Copilot will suggest values like Pending, In Review, Approved, Active, On Hold, Complete, and Cancelled.
- “Suggest a list of IT service categories for a help desk tracker” , useful for building drop-downs in an incident log or service request register.
- “Find all unique values in column B and list them in column F” , great for generating a source list from existing messy data before you standardise it.
- “Apply data validation to cells C2 through C100 using the values in column F” , Copilot can configure the validation rule for you without navigating menus manually.
Copilot is particularly useful when you are inheriting a messy spreadsheet and need to identify what values are actually in use before building your drop-down list from scratch.
Real Business Examples
Drop-down lists solve problems across every part of a business. Here are four practical examples where they make a real difference.
Status fields: Project trackers, task lists, and service registers all benefit from a locked status column. Values like Open, In Progress, Pending Approval, and Closed ensure reports and filters work correctly every time.
Department lists: HR registers, expense forms, and budget trackers often require a department column. A drop-down linked to your current department list keeps data consistent and easy to filter across the entire organisation.
Product categories: Sales teams logging opportunities and invoicing staff recording line items need consistent product or service category names. A drop-down prevents “Cloud Services” and “cloud services” from appearing as separate categories in a pivot table.
Approval stages: Workflow trackers for contracts, purchase orders, or onboarding checklists benefit from drop-downs that reflect the actual stages in your process: Submitted, Under Review, Approved, Rejected, Archived.
Frequently Asked Questions
Can I add new items to the list later?
Yes. If your list is stored in a cell range, just add values to that range and the drop-down updates automatically. If you typed values directly into the source field, go back into Data Validation and edit them there.
What happens if someone pastes data into a validated cell?
Pasting can bypass Stop-style validation in some cases. To prevent this, consider protecting the sheet so that only the designated input cells are unlocked and editable.
Do drop-down lists work in Excel Online and on Mac?
Yes. Data validation and drop-down lists work in Excel Online and on Mac, though the menus may look slightly different from the Windows desktop version.
Will the drop-down list still work when I share the file?
Yes. The validation rules are stored inside the file itself and apply to everyone who opens it, regardless of their device or Excel version.
If your team is spending time fixing data inconsistencies in shared spreadsheets, drop-down lists are a fast and permanent fix. For more help getting the most out of your Microsoft 365 tools, contact the Otto IT team or book a call with us to discuss how we can help your business work smarter.
managed it support articles
Related Blog Articles
Discover more insights to optimise your business with the latest IT trends and best practices. Stay ahead of the curve by learning how to leverage cutting-edge technology for success. Explore expert advice and valuable guidance to navigate the evolving world of IT solutions